One of the first things you will want to do when starting out is to create accounts to store your transactions.
When first loaded, the account tree will be empty except for four basic categoryies: Bank, Liability, Expense, and Income. Also at the top will be a place holder for future budgets that you will create.
To set up accounts quickly, you can select from a default set of accounts integrated into the application. To bring up this list, you can right click on one of the categories in the tree and select option Add Accounts From List.
Once you have your accounts set up you can import your transactions into Infinity PFM by selecting File | Import followed by either QIF, QFX, or OFX formats. This will bring up a file loader where you can select the file provided by your bank. The banks data will be loaded into a form where you can assign accounts to store transactions.
Infinity PFM supports formats QFX, OFX, and QIF. Most bank websites will offer one or more of these. Once you have download from your bank's online banking site you can select FILE -> IMPORT from Infinity PFM's file menu followed by the format you are interested in.
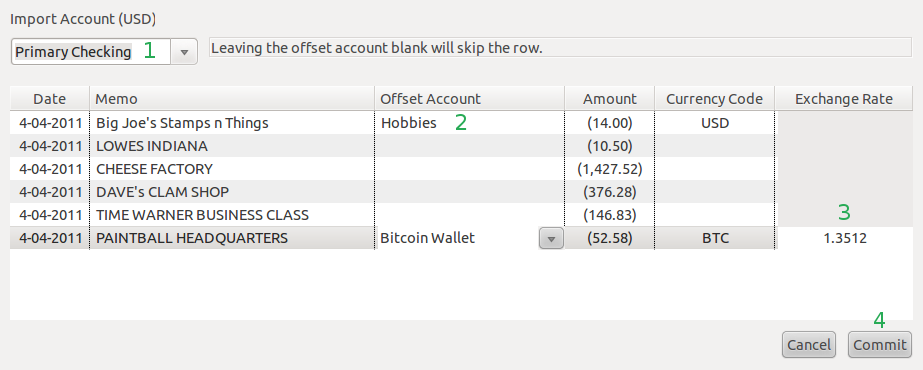
Infinity PFM will prompt you fro the location of the file to import and once selected, the below dialog will load.

Once loaded you can now start assigning the transactions to accounts. To start you must select an import account to load the transactions into. (#1 in screenshot) This will be the Infinity PFM account you have created to track transactions from your bank.
Infinity PFM will try to automatically match transactions to accounts based on prior import history. For those not matched, you must manually assign an offset account to the transaction (#2 in screenshot)
If you are using accounts with different currencies (#3 in screenshot). Infinity PFM will provide an exchange rate if you're are using an offset that is in a different currency than your import account. You can override this value and type in your own rate if the provided value is not accurate for the transaction date you are interested in.
Finally, once all transactions have been assigned offset accounts and exchange rates (if necessary), you are ready to commit. (#4 in screenshot). After selecting commit, you will be prompted to confirm that you want to commit. Select Yes to commit the transactions and they will be added to the proper accounts you assigned.
When importing a CSV file you need to first define how the columns are laid out. The import definition dialog below will display allowing you to select an existing definition or define a new definition. Clicking continue will load the transactions ad take you to the standard import screen for account assignment.
For the memo field you can also use the "+" characters between field names to combine multiple columns into the memo field.
Below is a working example for BitPay's CSV export
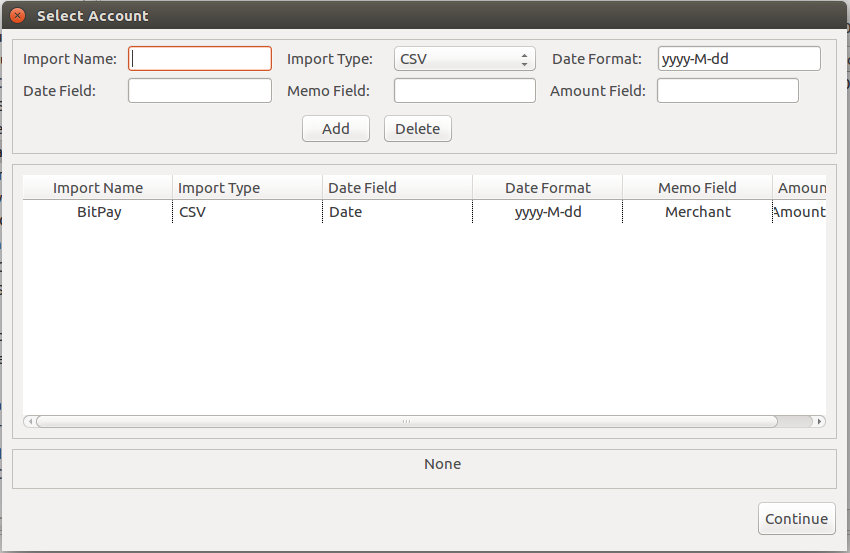
You must also define the format of date values using the Java 8 Patterns and Formatting as defined here .
Your data is stored in your home directory in folder .infinitypfm. You backup your data as follows:
A tarball of your data will be created at the chosen location with a date stamp on it.
To save work on having to constantly assign offsets to your transactions, you can
assign a basic rule to assign a pre-configured offset to a transaction if it fits a
specified pattern.
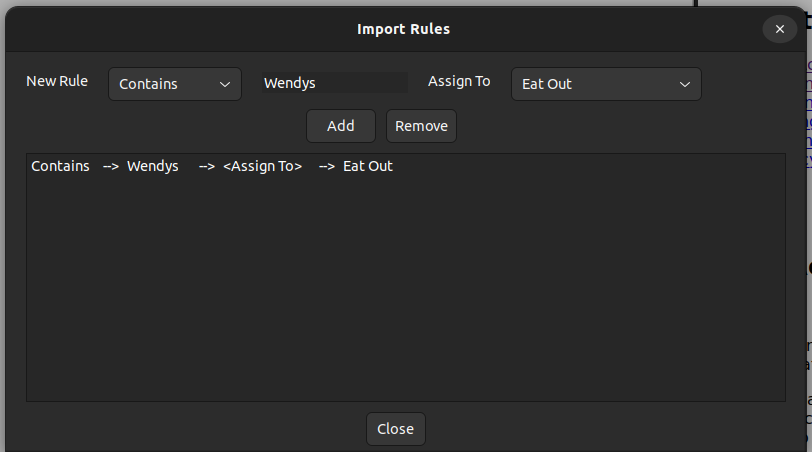
In the example below a rule has been set up whenver a transaction is found to have a memo field
containing the wordy Wendys, the offset Eat Out will automatically be assigned.
Setting up recurring transactions.
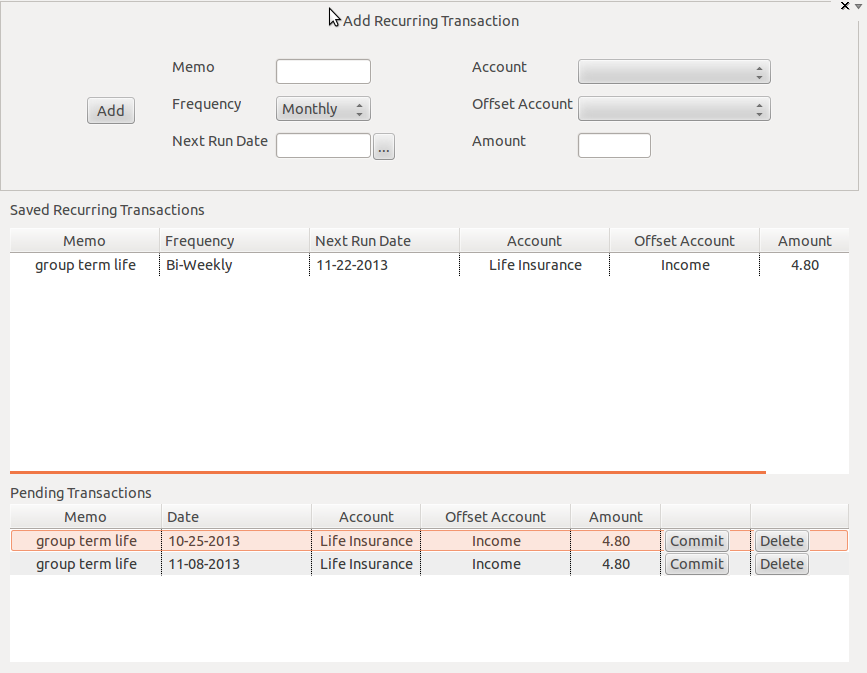
To set up recurring transactions, first open then recurring transactions view from the tool bar and enter information about your transaction at the top of the page.
Enter values for memo, the frequency of the transaction, the account you want to apply the amount to, the offset account you wish to use, and finally the amount.
Once this information entered and you are ready click the add button. Once clicked the recurring transaction will be added to the recurring transactions table just below the input header. At this point Infinity PFM will begin to track the recurring transaction by keeping an eye on the next run date column. Once a recurring transaction is due, Infinity PFM will automatically generate a pending transaction in pending transactions table at the bottom of the page.
At this point you can either commit the transaction or delete it. Note that transactions are not automatically committed.
Here is an example for a bi-weekly charge for a life insurance policy.
Under View -> Options menu you select your default currency. The defualt is USD when first installed as shown below.
You can also set currency precision here which sets the number of decimal places to use when displaying numbers. As some currencies require very small denominations you can set this up to eight decimal places. The defualt is two decimal places.
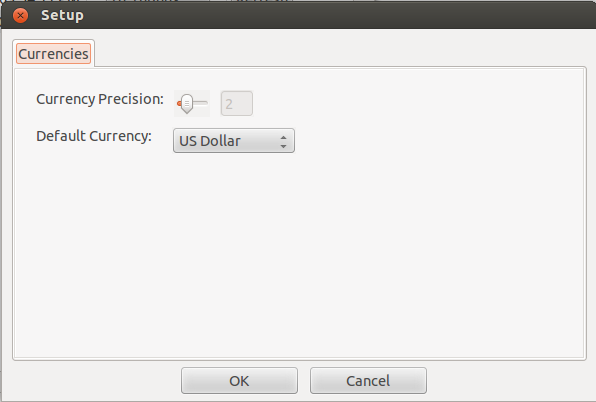
By default two currencies, Bitcoin BTC and US Dollar, are set up for you automatically and BTC is set up with one update methods for bitstamp.net and coinbase.com.
Below is an example with the Rupee currency added along with an update method for it called re_rupee3
Clicking the refresh button on a currency will cause Infinitpfm to attempt to pull the latest currency exchange rate for your default currency.
The last update column shows the last time the currencies were refreshed via an update method. The Refresh All button will update all currency using the currently active update method.

You can have as many update methods as you want for each currency but only one can be active at a time.
If we wanted to add a second update method for Bitcoin to the Bitstamp exchange for example we can use this url from the Bitstamp site as a source for our update method.
An update method URL must return a JSON payload. If we load the ticker url into our browser for the above URL we get something like below
To reference values from the payload to use for our currency we use a JSONPath like expression. For example if we wanted to use the "last" value from Bitstamp as the exchange rate for our Bitcoin currency we would use a path expresion like below.
Please note that full JSONPath functionality is not supported and only basic path expressions can be used.
Putting it all together we end up with a update method like below.

Choose the currency you want to assign the method to and click the Add button
Once added, the Bitcoin currency will look like below and clicking the refresh button will update the exchange rate using Bitstamp as the source.

Use at your own risk. Relysia Wallets are currently in alpha as of August 25th, 2022 as is this feature implementation.
If you have signed up for a wallet at Relysia.com you can use Infinity PFM to interact with your wallet. The Bitcoin (BSV) wallet feature can be enabled under options by checking the box labeled Enable Bitcoin SV Wallet and then filling in the form to link with your Relyisa account.
Infinity PFM does not store your coins and they are managed by Relysia.com. Please read their documentation on how they store coins for further details.
Options fields:
Once options are filled out you must restart Infinity PFM
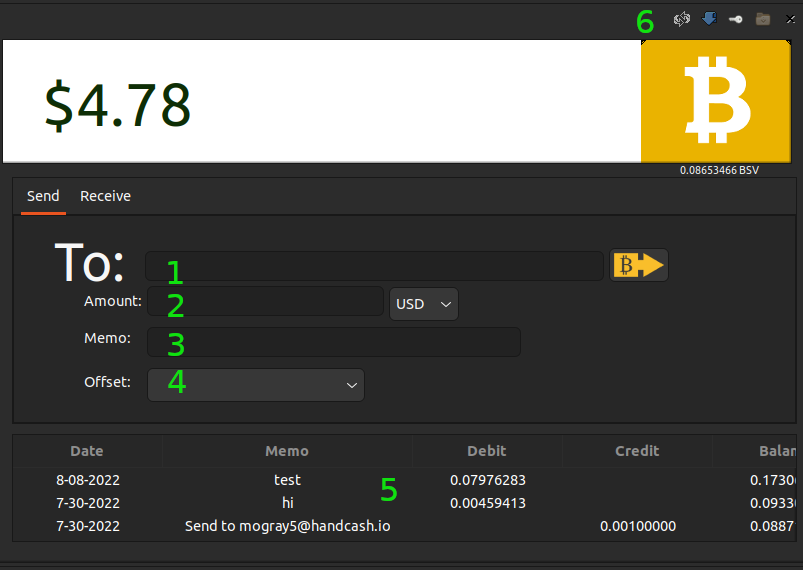
On the spend tab you can send coins using either Paymail or by entering a Bitcoin address. In addition to sending coins, you can also specify an offset account to properly account for the spend. If the offset is a non BSV based account then the amount will be converted to the local currency provided you have the currency configured. See Currency Setup for more on that. When the wallet first loads it will check Relysia for any new transactions and if any are found you will be prompted to record the offsets for each and they will be added to the database. Here are the parts of the spend page numbered in the example:
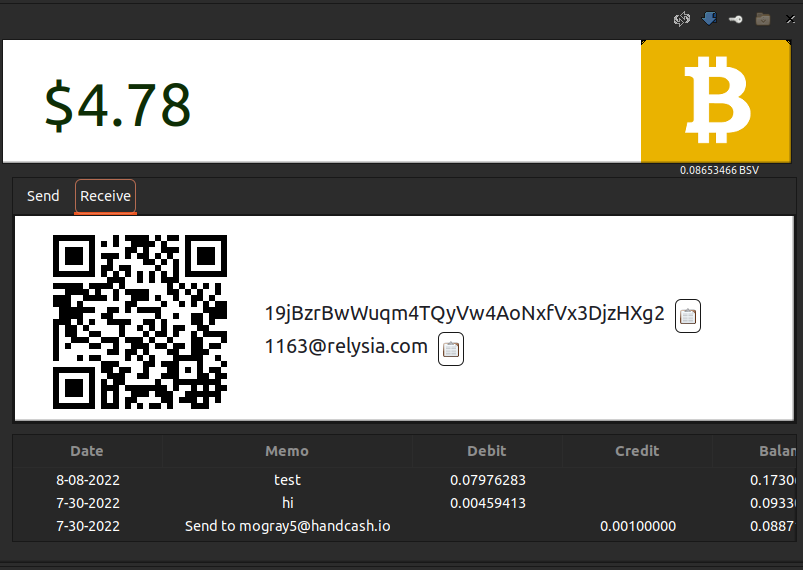
The receive tab shows a QR code that can be scanned to receive coins, a Bitcoin address, and the Relysia Paymail associated with your wallet.
The retirement planner allows you to run retirement scenarios to help in planning for your golden years when you will be relying mostly on money that you have saved during your working years.
To open the planner, click the planner icon in the main toolbar or  or select View -> Retirement Planner from the main menu.
The planner when opened will look like below.
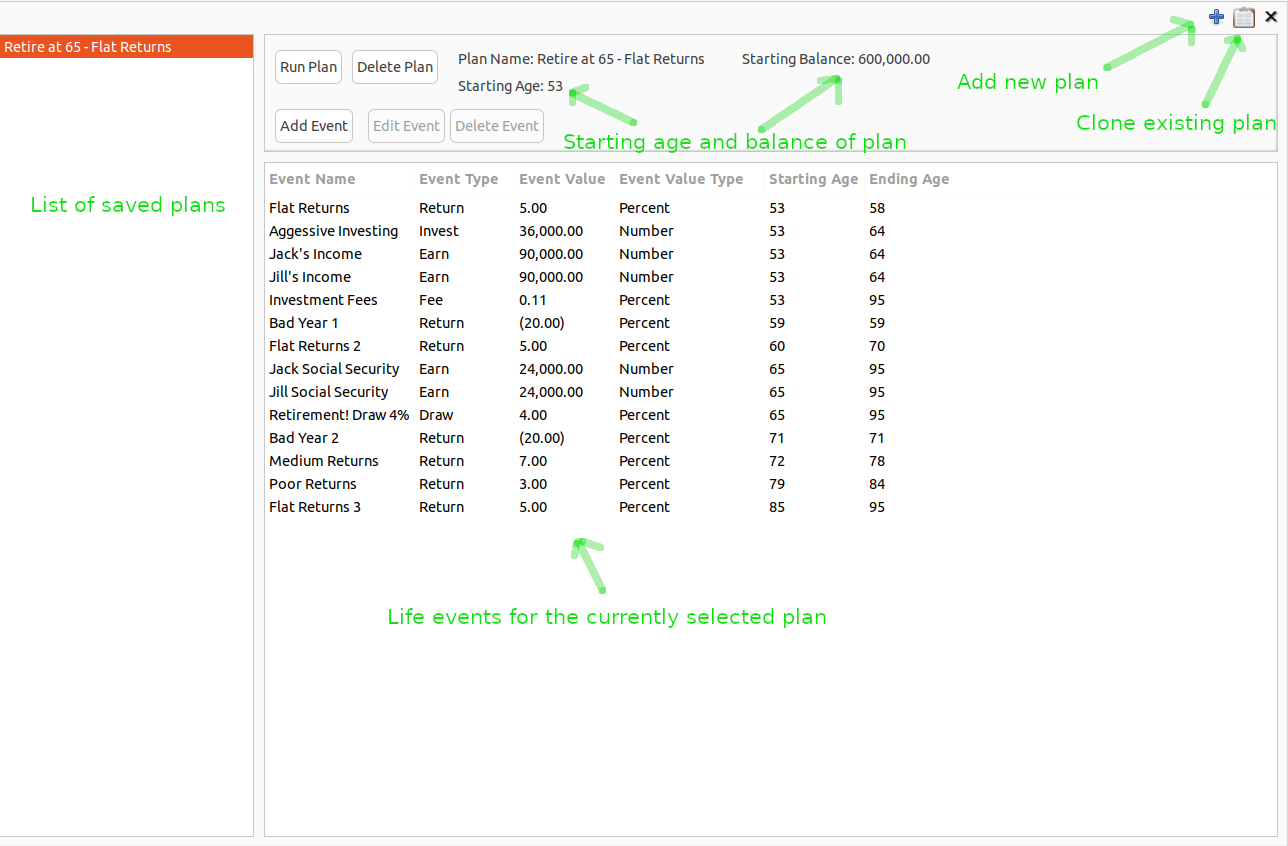
New plans have a starting age and investment balance. In the example shown, Jack and Jill have a plan with a starting age of 53 years old and a starting balance of $600,000 USD in investments.
You can add live events to your plan comprising of:
In the above example, Jack and Jill will both earn $90K per year between ages 53 and 64 and will aggressively save for retirement during tha time adding $36K annually to their investments.
Jack and Jill both retire at age 65 and begin collecting social security and at the same time begin drawing down 4% from their investments annually.
They expect to pay .11 percent fees on their investments and also expect to have added a mix of flat investment returns (5%), medium returns (7%), poor returns (3%), and also have added two years with a large drop in the market where they had large negative returns (-20%).
If we run Jack and Jill's plan by clicking the Run Plan button or by right clicking on the plan and select Run Plan we see the below results:
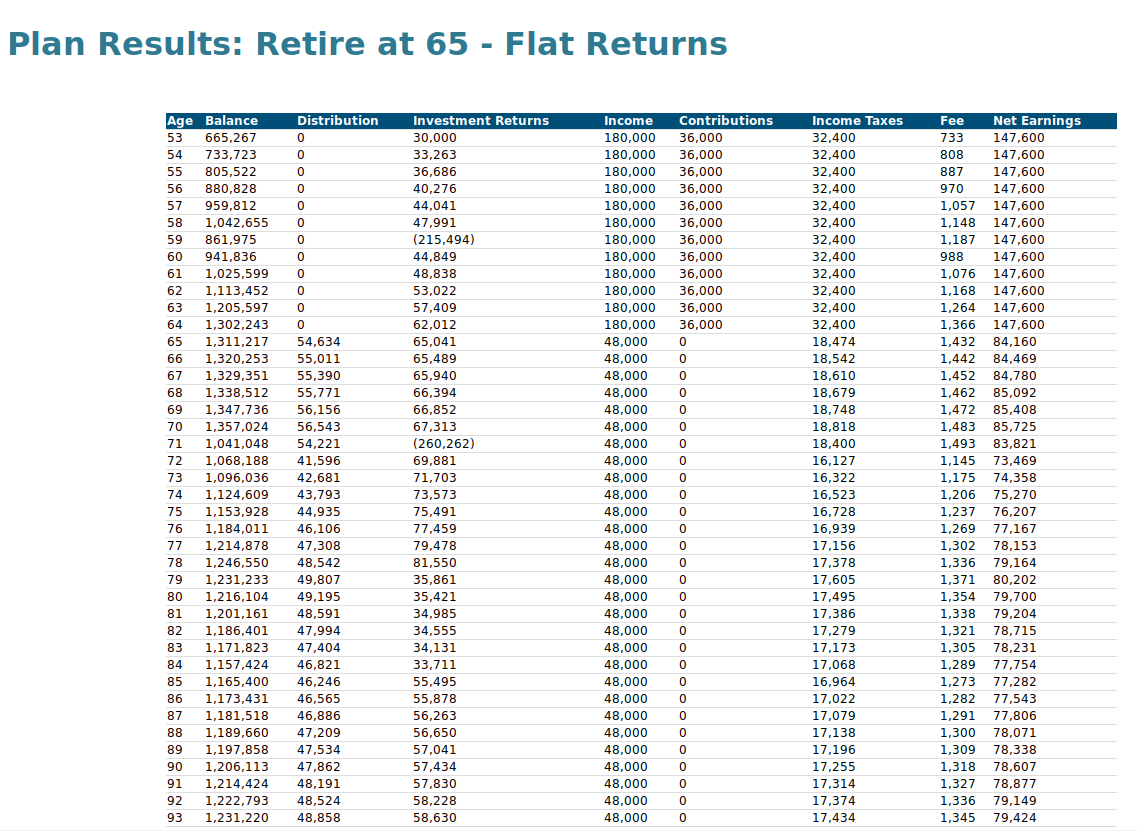
The columns of the plan report are defined as follows:
In this example,Jack and Jill saved aggressively until their retirement and, even with the market crash in their 58th year, still managed to accumulate 1.3 million for retirement. With drawing 4% from their investments coupled with their social security income, they maintained a steady income in retirement while also maintaining a healthy balance in their portfolio.
If your plan runs out of money the year where the money ran out will be marked in red and the plan will end.